Attestor Node Guides

Attestor Node Guides
This guide explains how to deploy the Primus Network Attestor Node using TEE (provided by Phala) in production environments.
1. Supported Chains
| Chain | ChainId | Task Contract Address | Support |
|---|---|---|---|
| base-mainnet | 8453 | 0x151cb5eD5D10A42B607bB172B27BDF6F884b9707 | ✅ |
| base-sepolia | 84532 | 0xC02234058caEaA9416506eABf6Ef3122fCA939E8 | ✅ |
2. Deploy the Node using TEE
2.1 Register a Phala Account
- If you don't have a Phala account, you can register one here.
2.2 Deploy the Node
1. Visit the deployment template and click Deploy button.

2. Please fill in the required fields:
Name: This node's name, you should use the default name.
KMS Provider: Only supports
BaseNode:
prod7Instance Type: Use
Large TDX Instance(4 vCPU, 8 GB)Storage: Larger than
20 GBOperating System:
dstack-0.5.4.1Encrypted Secrets: Please set
PRIVATE_KEY,BASE_RPC_URL.PRIVATE_KEYshould start with0x.PRIVATE_KEYacts as the owner of the node, used to report results, and will also be used to register the node. The whitelist address referenced in the register the node section is the address derived from this private key. We recommend creating a dedicatedPRIVATE_KEYfor running the node.BASE_TASK_CONTRACT_ADDRESS,BASE_CHAIN_IDandIMAGE_TAGplease use the default values.NOTE: If you want to deploy
Primus NetworkonBase Sepolia, please modifyBASE_TASK_CONTRACT_ADDRESS,BASE_CHAIN_IDandBASE_RPC_URL.These values can be found under Supported Chains.
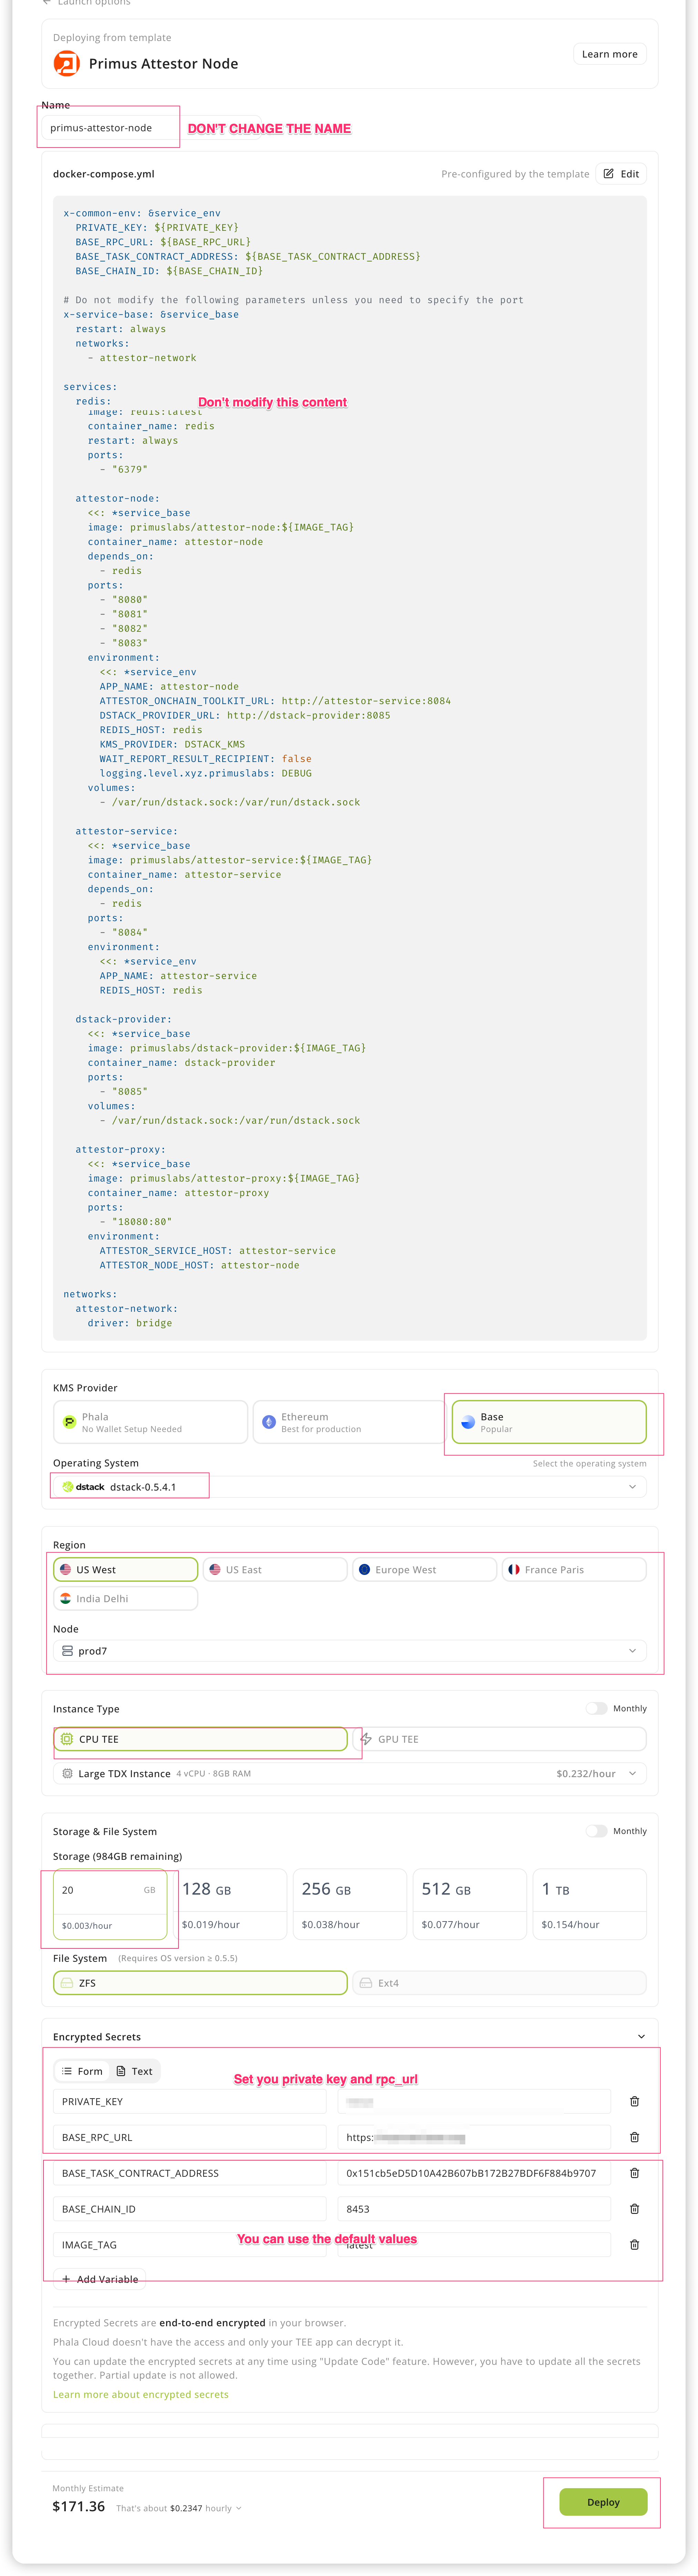
3. Click Deploy to start the deployment process.
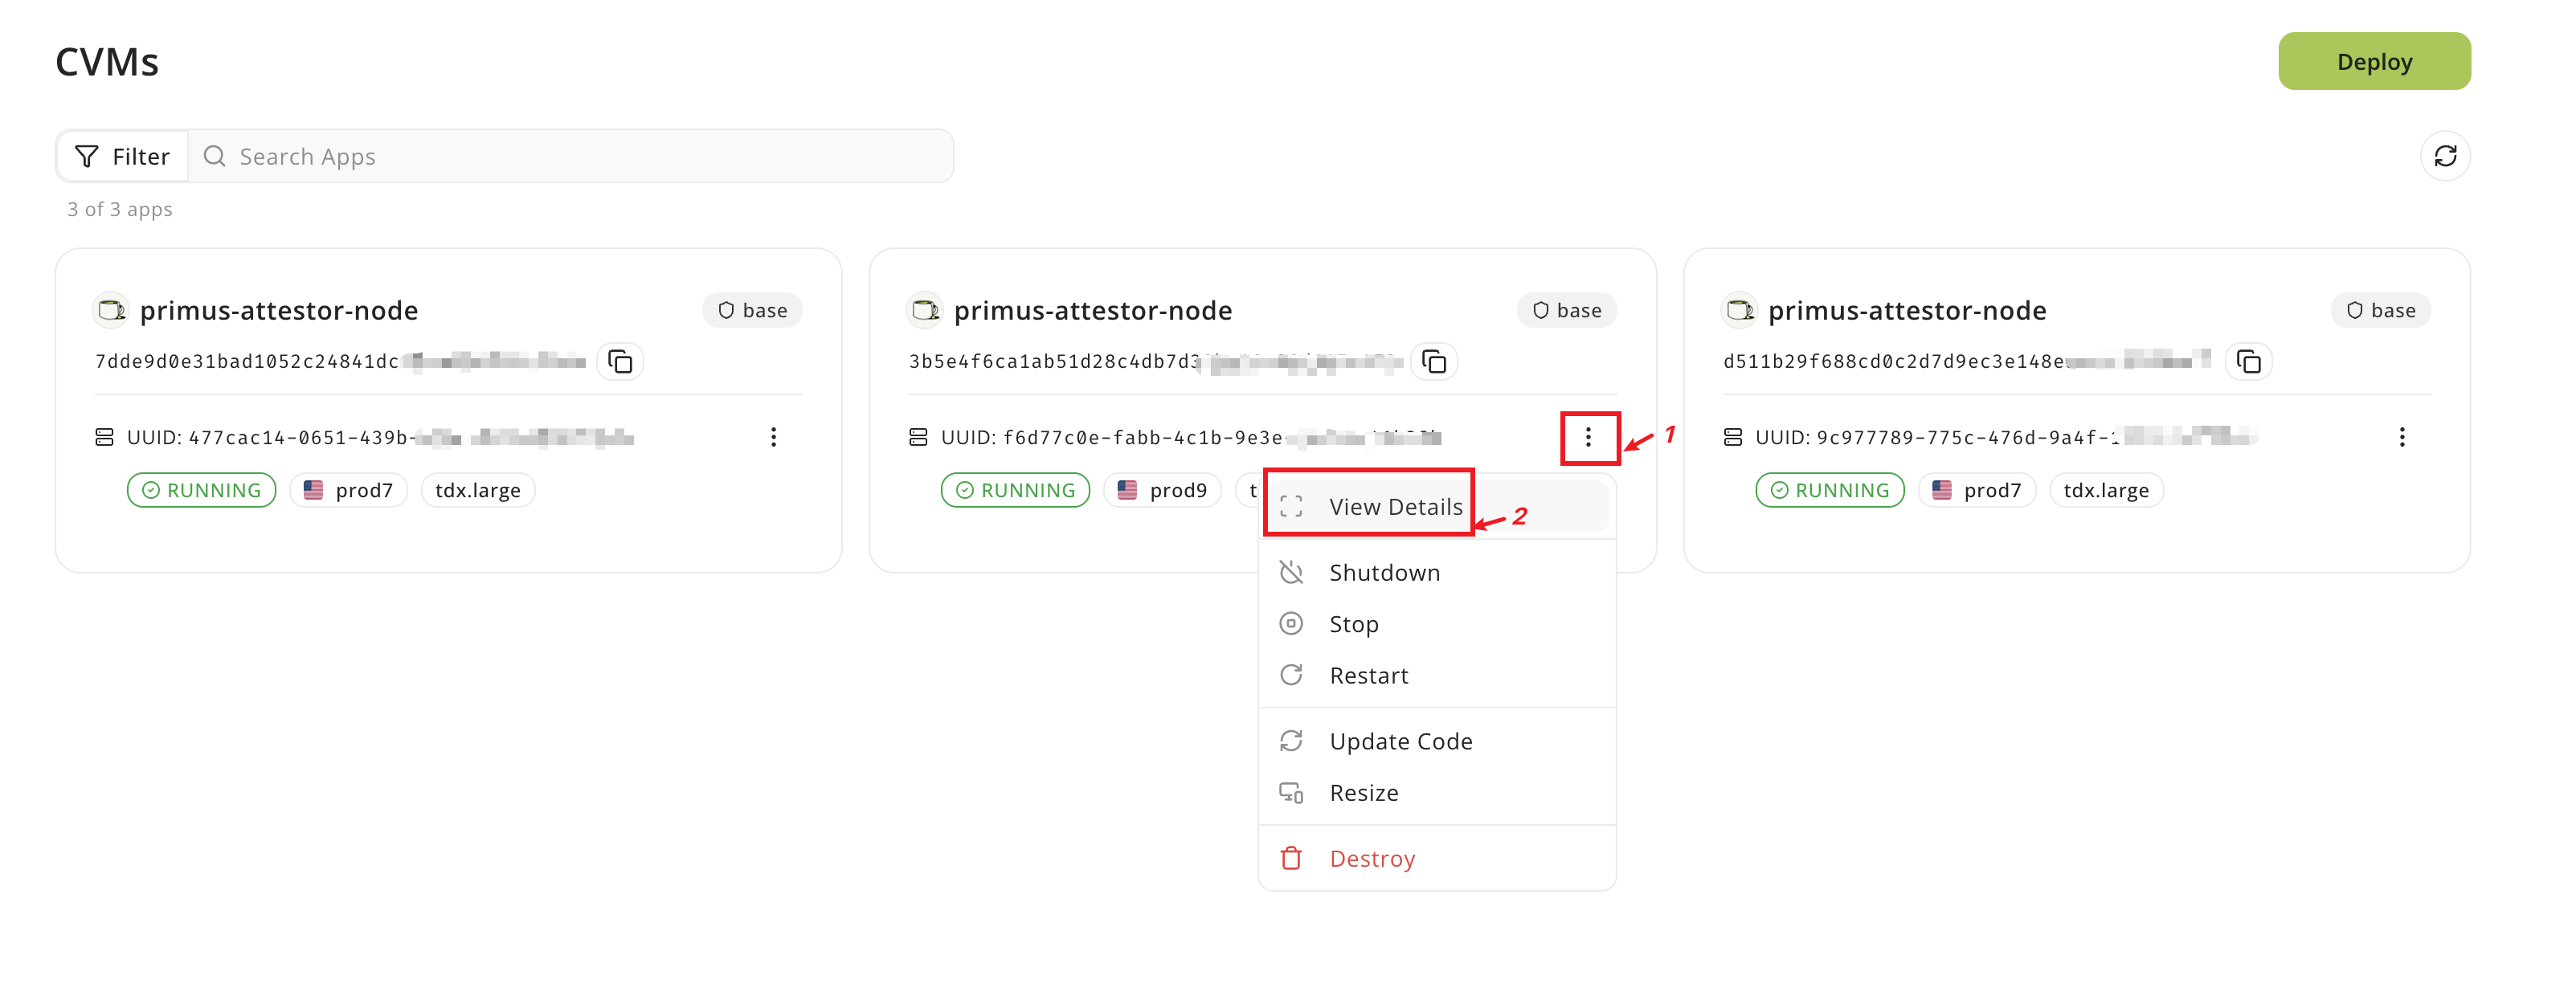
4. Click the detail button to view the deployment status.
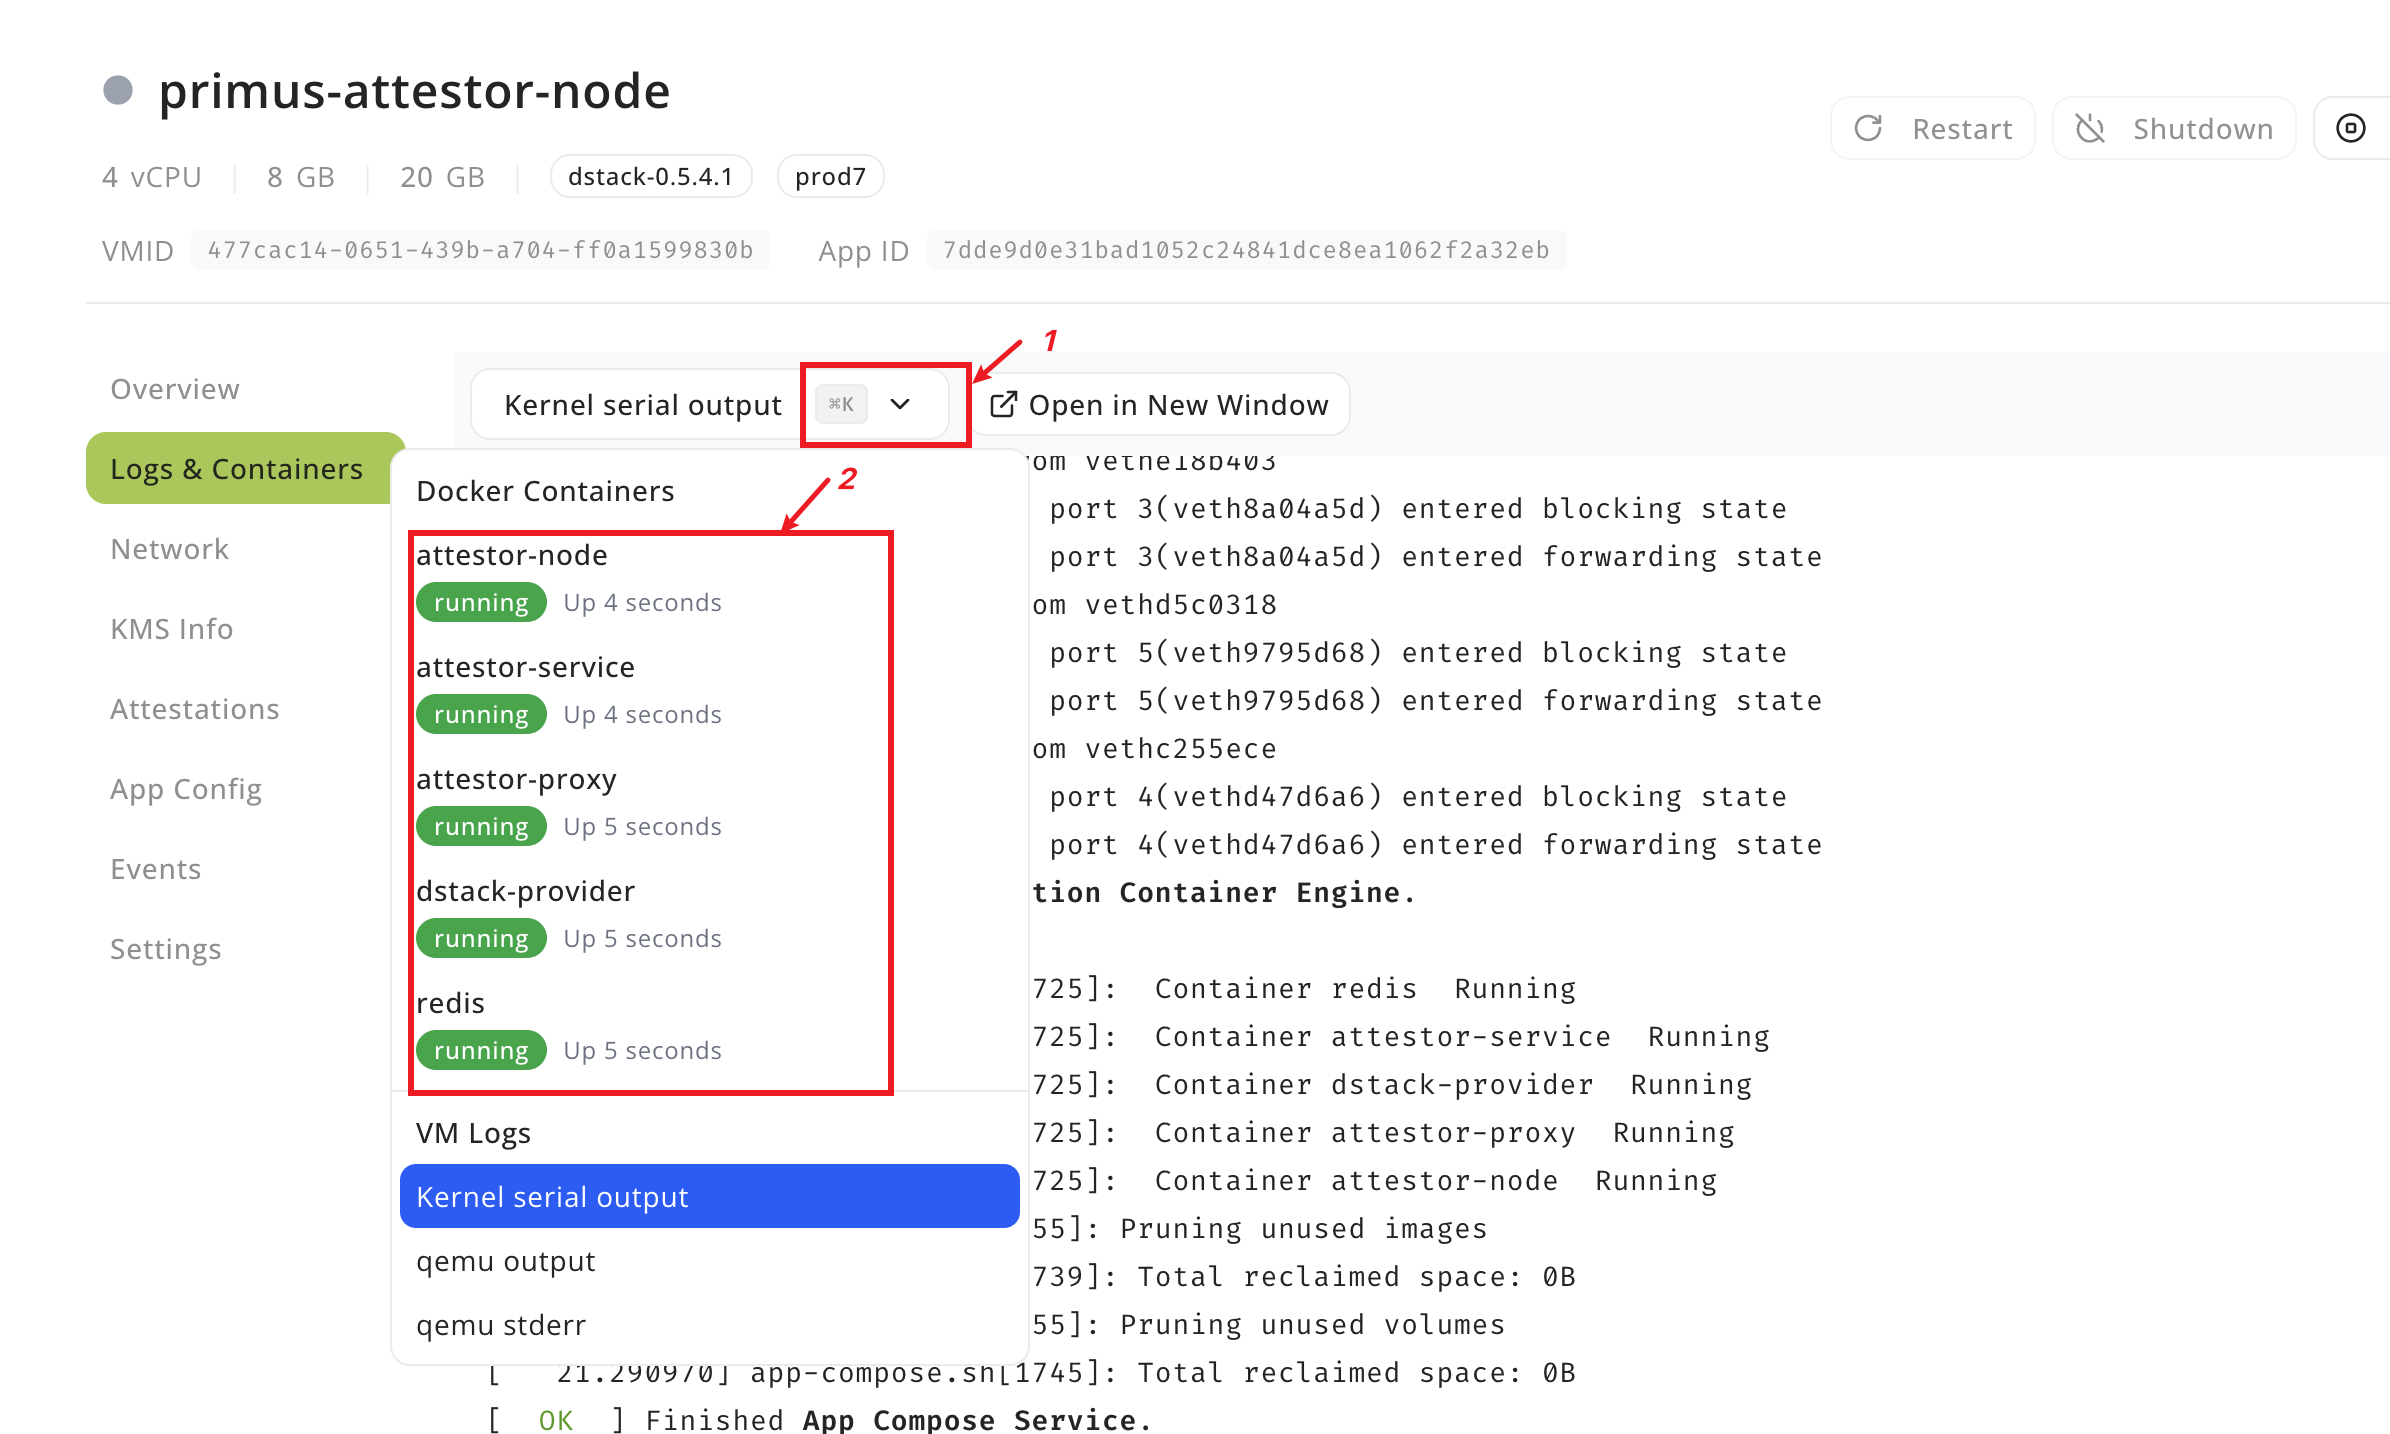
5. If everything is successful, you will see the following services:
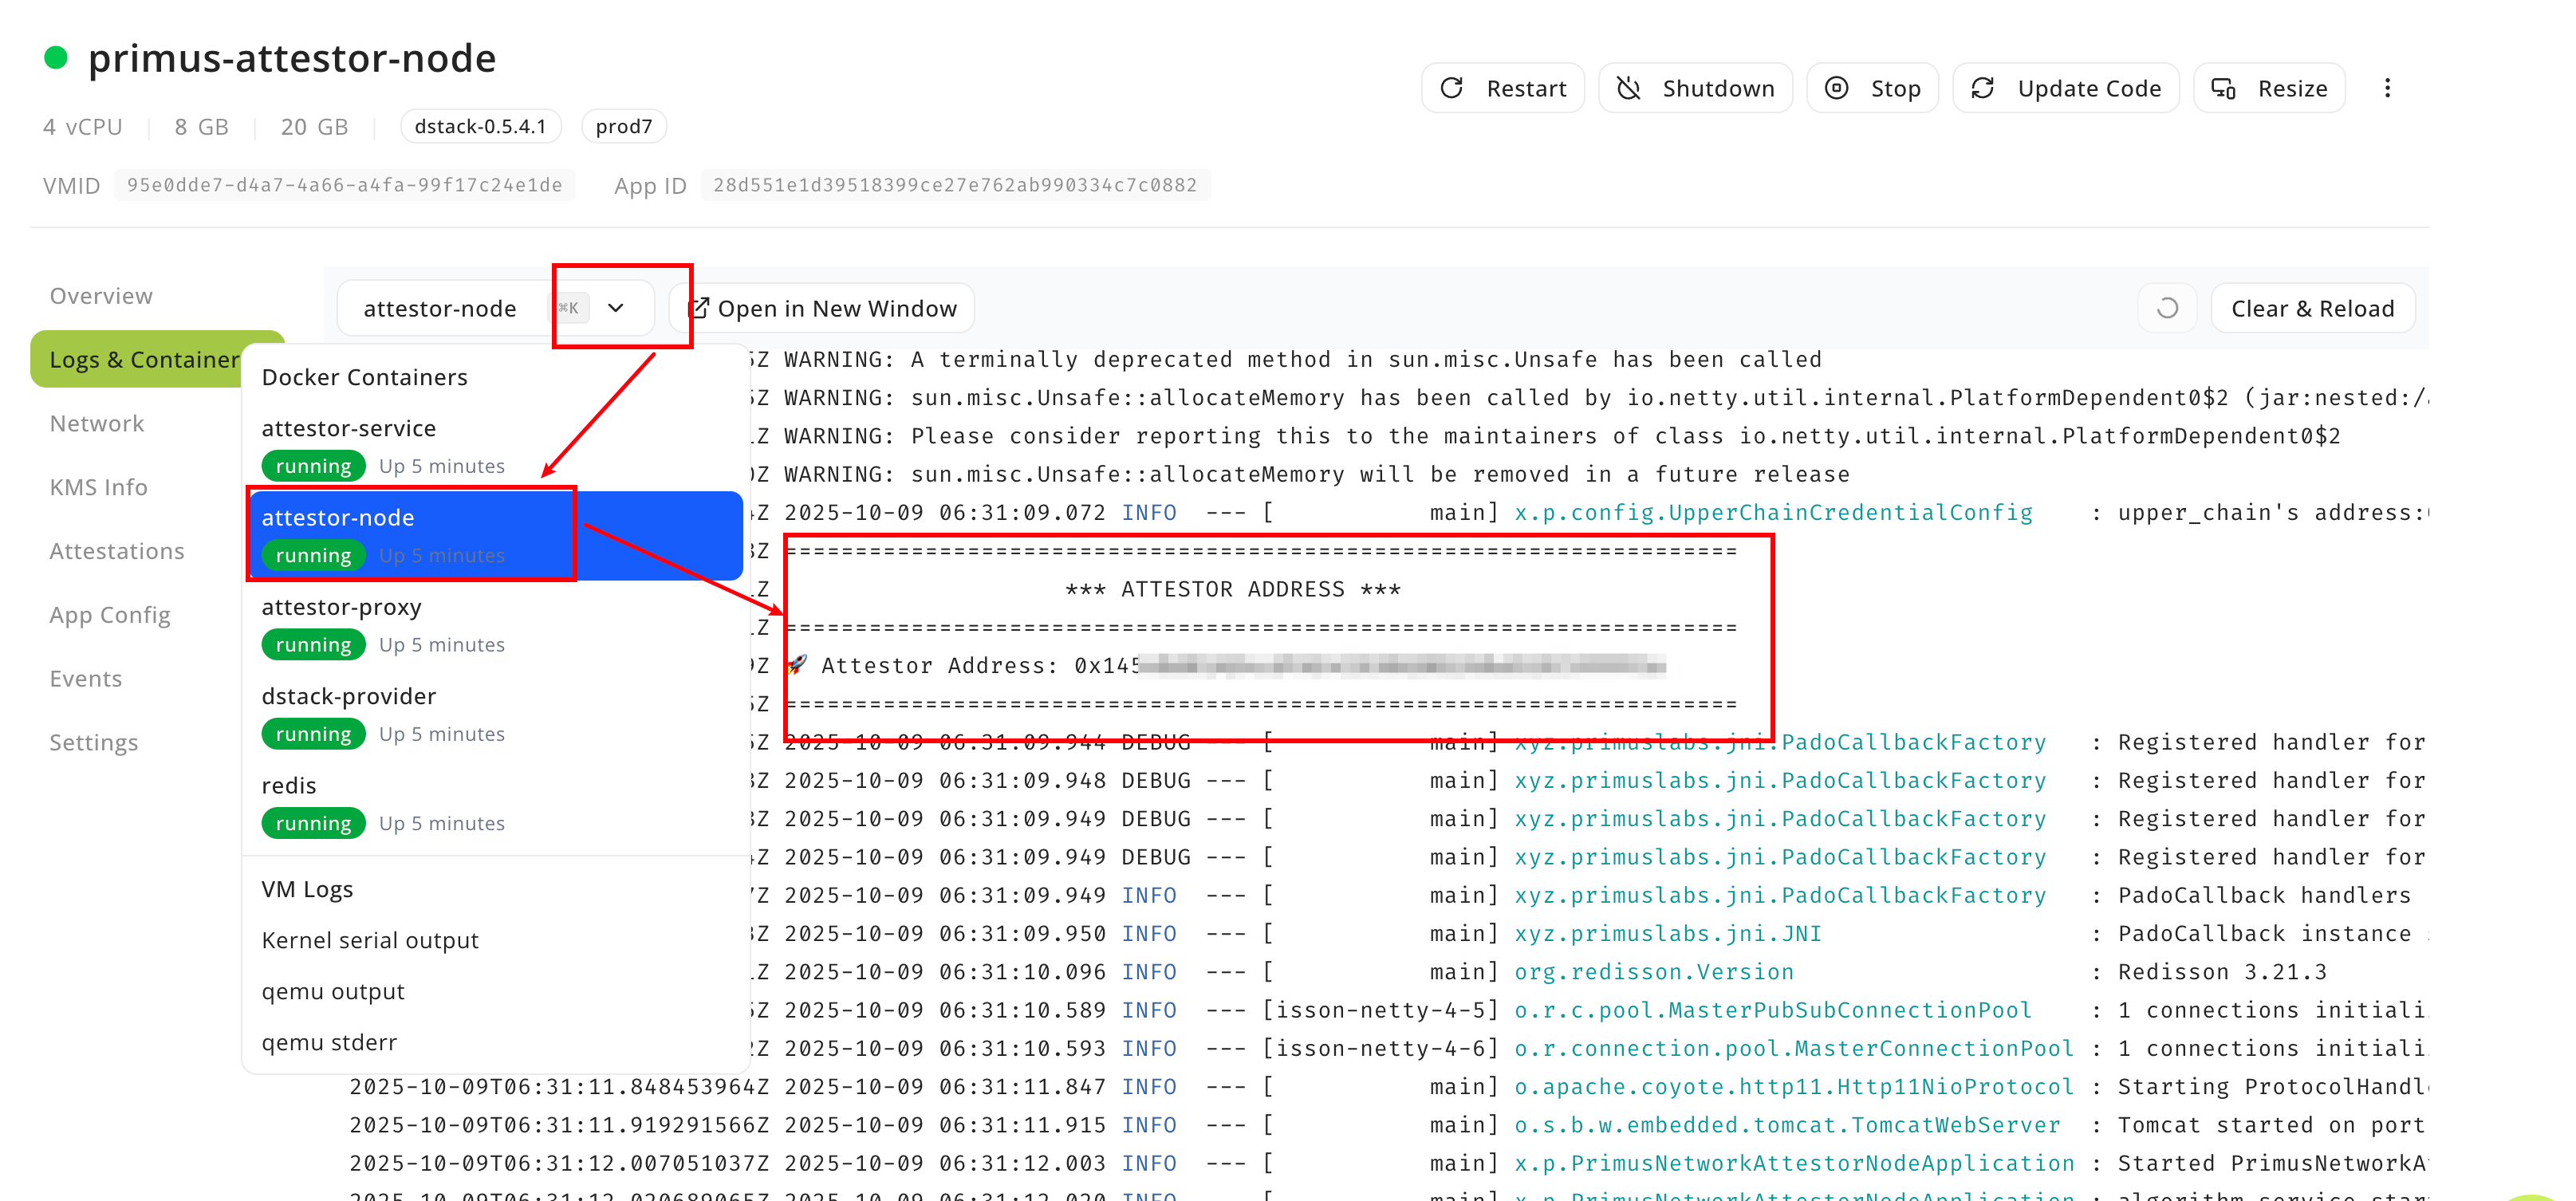
6. Click the attestor-node service to view the node's log. You will find the attestor's address in the log. Please save this address as you will need it when registering the node.
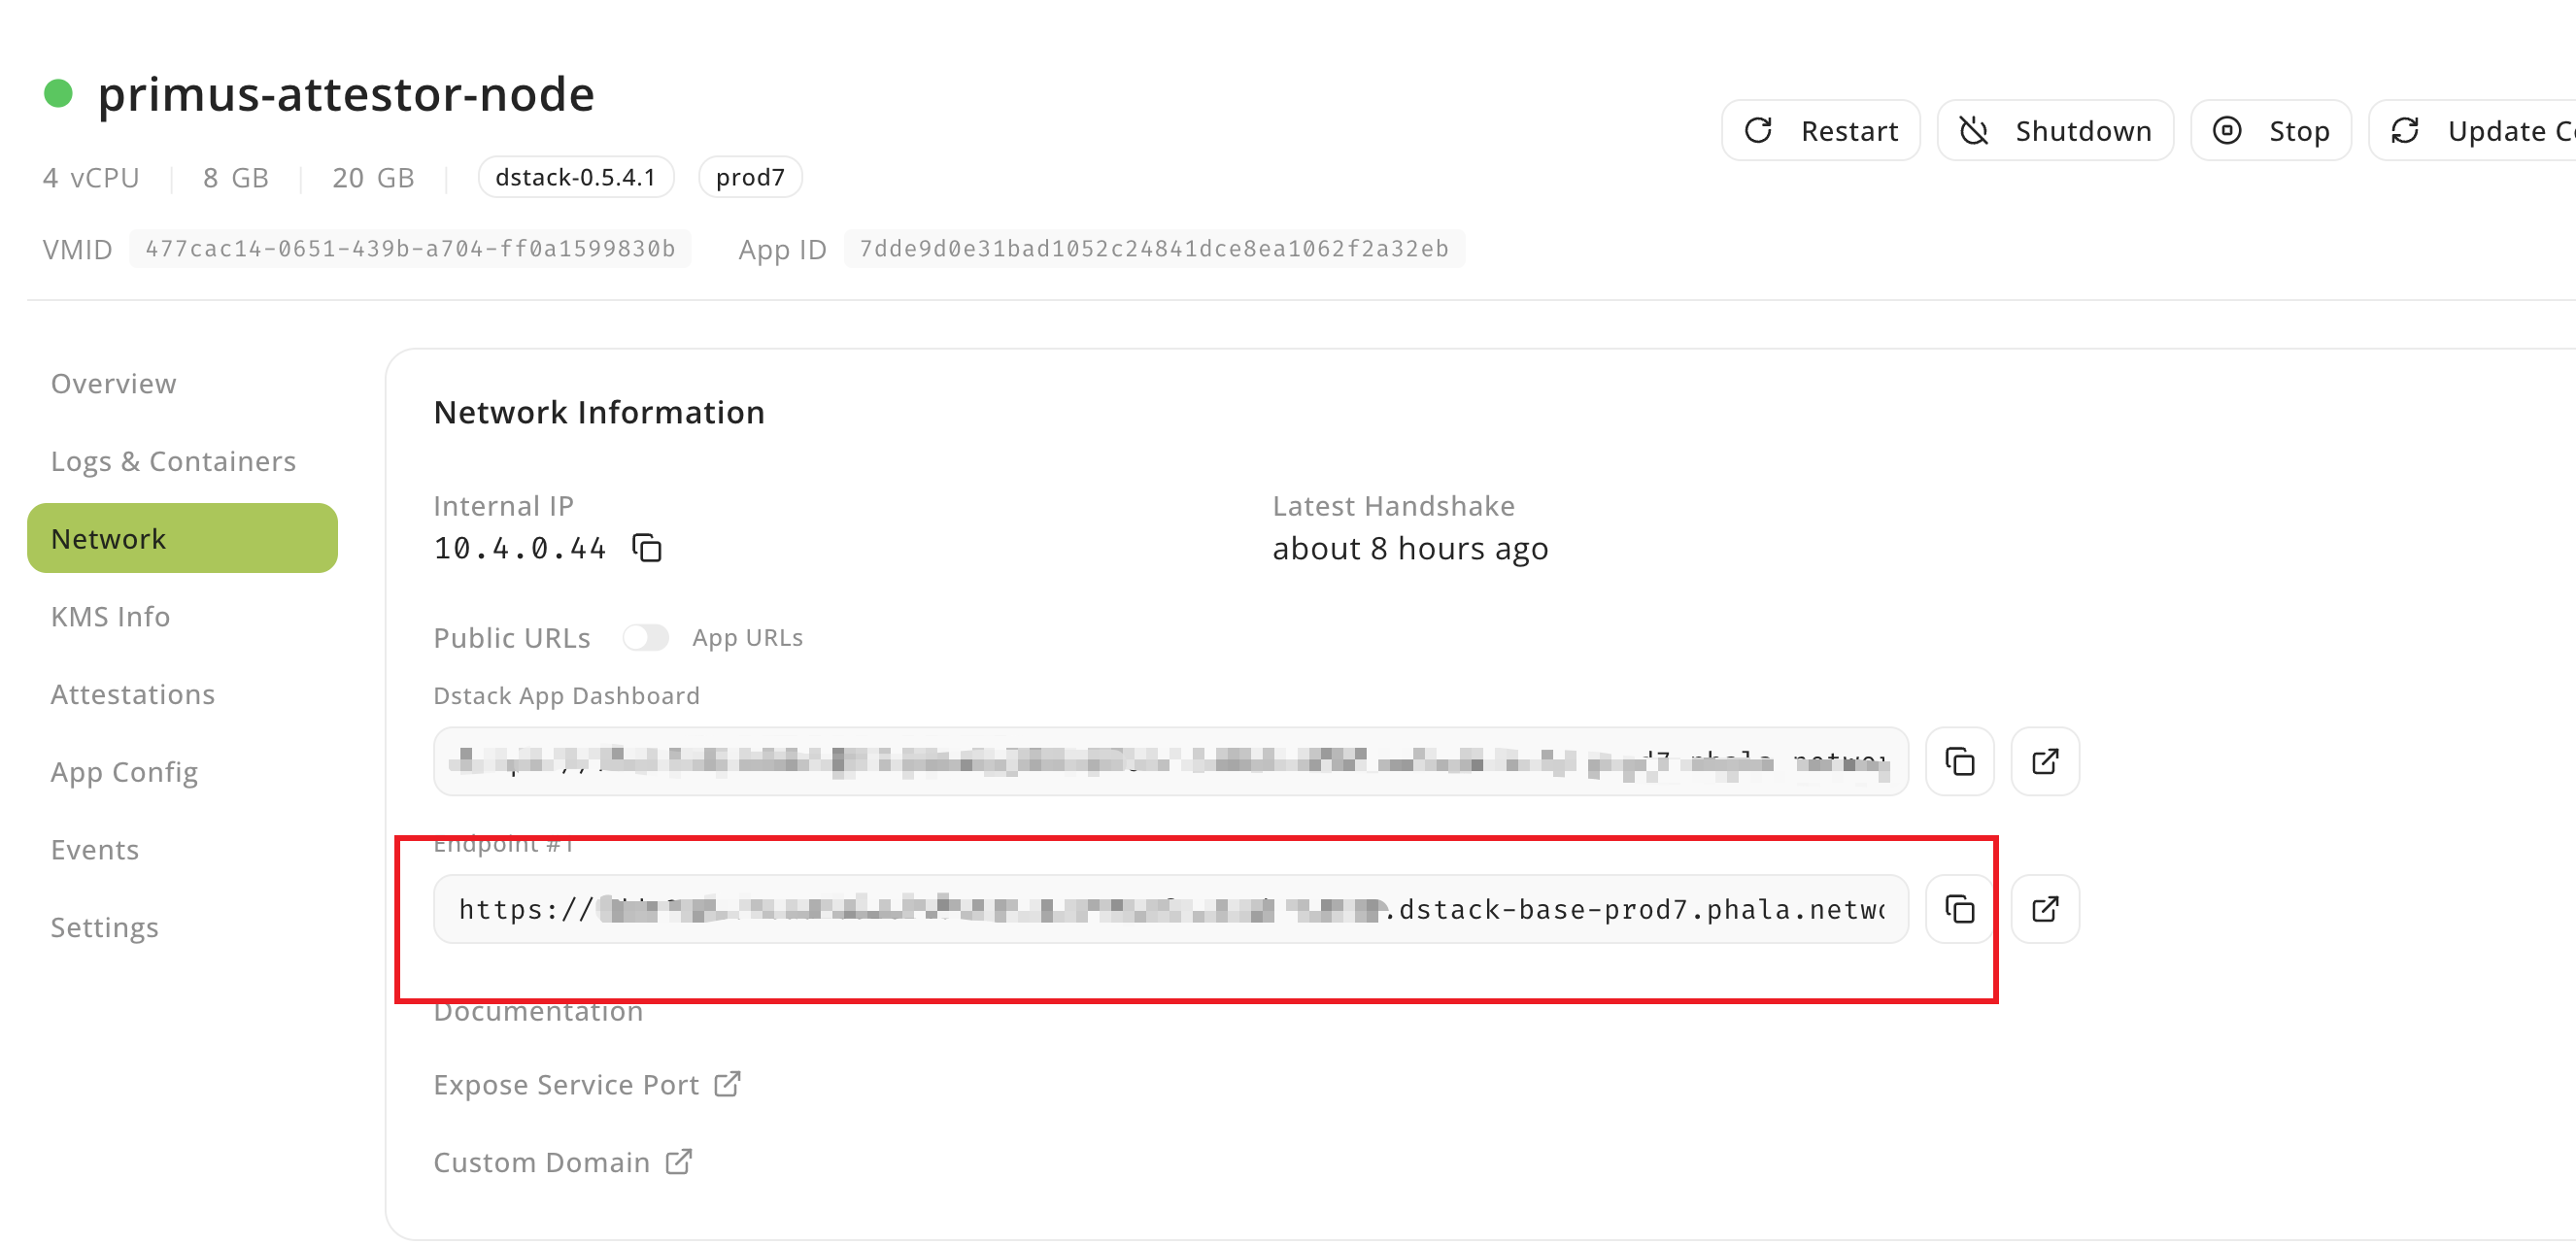
7. Click the Network tab to check your Network Information. Please save this endpoint for registering the node.
8. Copy the endpoint from step 7 to your browser and you will see the following information:
 If you see
 Hi, PRIMUS NETWORK!, it means you have successfully deployed the node.
3. Register the Node
NOTE: Before managing a node, you must first contact the primuslabs team to add the node owner address to the whitelist.
3.1 Prerequisites
Make sure Docker is installed on your system.
3.2 Clone and Prepare
git clone https://github.com/primus-labs/primus-network-startup.git
cd primus-network-startup
chmod +x ./run.sh
3.3 Set Environment Variables
Based on the chain where your node is located, run the following command:
cp env_files/.env.<chain-name> .env
Then set your private key, RPC URL, and other parameters:
PRIVATE_KEY=0x
RPC=<Your RPC URL>
NODE_CONTRACT_ADDRESS=
ATTESTOR_ADDRESS=
RECIPIENT_ADDRESS=
ATTESTOR_URLS=<node-domain1>
NODE_META_URL=https://api-dev.primuslabs.xyz/node1-meta.json
- PRIVATE_KEY: This is the node’s owner key and must be the same
PRIVATE_KEYused in above. We recommend depositing 0.01 ETH to this address. If you set it as theRECIPIENT_ADDRESSbelow, it will automatically receive task fees. This ensures sufficient balance for reporting results. Otherwise, you must manually monitor and maintain the balance. - RPC: rpc for the chain.
- NODE_CONTRACT_ADDRESS: This is the address of the node contract. You can use the default value from
env_files/.env.<chain-name>. - ATTESTOR_ADDRESS: Attestor's address to sign attestations, this address is from above attestor-node.
- RECIPIENT_ADDRESS:Address to receive task fees. This address can be set to the node owner address corresponding to the PRIVATE_KEY above, or to any other address.
- ATTESTOR_URLS: Attestor node domain names. This domain is from endpoint above, and remove
https://, just the domain name like:dd26063786a0fccd8e4cc499374b4515d4df1e87-18080.dstack-base-prod7.phala.network.If you have multiple URLs, separate them with commas. - NODE_META_URL: Attestor node metadata url. The metadata should be a JSON document containing the following fields:
{
  "name": "Your node name",
  "description": "Introduce your node",
  "website": "Your website URL",
  "x": "https://x.com/<your_x_username>",
  "logo": ""
}
MAKE SURE NODE_META_URL IS PUBLICLY ACCESSIBLE ON THE INTERNET.
3.4 Register the Node
sudo ./run.sh register
If you want to unregister from the Primus network, run the following command:
sudo ./run.sh unregisterPlease note: Unregistering from the network means you will no longer receive any tasks and will not earn any income.